|
When we really care about singing (or anything we’re personally invested in), we can resist or avoid engagement with it for fear of not meeting our own or others’ expectations. In avoiding disappointing ourselves, we can only end up disappointed. When we resist practicing, we compound our avoidance for feeling out-of-shape. When we resist auditioning or performing, we regret a missed opportunity. Whenever we succumb to negative thoughts about our artistic pursuits, we only add to our self-sabotage. The process of singing will always be ongoing with the bar for our expectations always rising. There will always be frustrations, blocks, and challenges along our creative path. As difficult as it is, we should look at these hurdles in our progress as part of our singing process. The next time you feel yourself disengage from singing, ask yourself why. Remind yourself that there will never be a perfect time or space to practice, share your work, or go for an audition. There will never be a finished “product” ready for presentation. If we can reframe our fears of disappointment as feelings of importance, we are more likely to see challenges and hard work as opportunities: we are less likely to give up. We will start to see the creative journey as the goal and payoff. Embrace your voice where it's at today and be disciplined in enjoying the process.
0 Comments
Onset is a term used to describe how we initiate a sung pitch: the first moment of our tone. How we begin a note influences the quality of our sound throughout a musical phrase. If a phrase begins with good breath support and efficient vocal fold closure, good tone is more likely to be achieved and maintained. Conversely, if we don't start our phonation well, it is difficult to make an adjustment mid-phrase.
Here are examples of how we can lead into a sung note:
We can use various onsets intentionally for different timbral effects, however, to protect our instrument and to achieve a "pleasing" tone, we want to shoot for the BALANCED ONSET most of the time. To get used to finding and feeling the difference between different onsets, try repeating a single pitch in your comfortable range, alternating between the aspirate, glottal, and balanced onsets. Separate each new onset with a good breath. What does your throat feel like at your glottis (the vocal cords and the space between them) on each onset? Do you feel pressure build under your glottis before you sing or do you feel air pass through before the tone starts? Does your breath support change with each onset? Notice the contrast in sensation between each. Can you repeat a balanced onset consistently? For more info on onsets and exercises to help you find and use healthy technique, subscribe as a Patron! https://www.patreon.com/meghannwelsh "Practice makes perfect" is a tricky aphorism. We all know that the act of practicing is essential to improvement, but the questions of what, how, and how much to practice can often feel overwhelming or the answers are just shots in the dark. To improve, we need to work on intentional practice - yes, practicing takes practice. Intentional practice doesn't necessarily mean setting an alarm to remind yourself to sing everyday - although that's not a bad idea. Intentional practice is mindful practice. It is disciplined. These skills aren't easy with distractions, impatience, and the always capricious ignitor, Motivation.
A teacher can help you diagnose faults or set goals and help put in place specific exercises to address issues. But it is your job as the wanting-to-improve singer to implement the new habits (or eliminate the bad). New skills or approaches take consistent revisiting to form muscle memory and reflexive anticipation so that they don't distract from the whole multitasking system of singing. It takes practice to override a day's worth of normal-life habits and turn your body into an instrument. All of this is to say: try to practice every day, even if only for two minutes, and observe your approach. You will get better at it (practice) and you might even start to enjoy the process of improving your practice. Even if you don't make a sound, remind your body what it needs to do to become an instrument. Exercise the part of your brain that focuses on detail and sensation. Reinforce already good habits with mindful maintenance - don't neglect what's already working. Exercise your enjoyment of singing. Sometimes this takes intentional effort as well.  When your head is balanced squarely over your shoulders, gravity’s pull on that 11 pound noggin is no problem for your neck muscles - weight does not produce any torque on the point of support. However, when your head tilts forward, sideways, or backward so that it no longer sits centered over your shoulders, the equilibrium is disrupted. Gravity then pulls your heavy brainbox down so that nearby muscles have to work harder to support it and your neck 🦒. Too much of this will lead to an overused, strained muscle, which can occur on the front, side, and back of the neck. This can also lead to facet joint (vertebrae connector) inflammation.
Good posture is strain prevention, but when that fails us, motion is lotion ... Shoulder blade squeeze: While sitting in a chair, sit up straight with shoulders down, and squeeze your shoulder blades together toward your spine. Hold for a count of 5, or one or two slow breath cycles, and then release. Repeat this 3 or 4 times daily. Bird wing stretch: Place your elbows at your sides and touch your shoulders with your hands, creating your "bird wings." Keeping your hands on your shoulders and your ears aligned with your collarbone, raise both elbows slowly (in the time of a slow inhale). Try inhaling while lifting the arms and exhaling on the descent as well as the reverse. Shoot for multiple reps over 30 seconds, 3 or 4 times a day. Chin Tucks: Sitting up straight with your shoulders down, draw your chin back toward your ears (give yourself a double chin). Simultaneously, lengthen through the spine and lift upward through the crown of your head. Hold for 2 or 3 seconds and release. Breathe in as you tuck your chin and lengthen the spine. Breathe out on the release. You should feel a stretch in the back of your neck between your vertebrae (flexion). Don’t look up or down, just draw the chin back. Hold for about three seconds and repeat 10-15 times. Repeat as often as you need throughout the day. 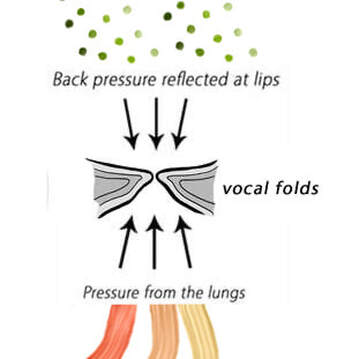 The lip trill is a great vocal warm up for obvious and not so obvious reasons. The obvious: Lip trills require us to relax our face and lips, and move our air at an energized and steady rate. This is a great way to warm up the voice and body! The not-so-obvious: Lip trills and other semi-occluded vocal tract exercises (having the mouth partially closed) encourage us to lengthen the vocal tract and narrow the mouth's opening at our lips. This creates increased acoustic back pressure which helps the vocal folds vibrate more easily. Aiming for similar shaping and sensations on open mouth sounds can help us harness acoustic energy for more efficient singing. So, using a lip trill helps us warm up through relaxing muscles, energizing breath, and calibrating mouth shape and sensation. Win, win, WIN!
Releasing and Minimizing Daily Tension:
Having an instrument that doubles as our daily body is a unique challenge for singers. Daily stress from normal working and living can wear on the instrument we need to be in tip-top shape for practice and performance. Here I'll offer some specific stretches and suggestions on how to minimize and release tension throughout the day. I'll focus on the most common locations that accrue tension and have particularly adverse effects for the singing instrument: the temporomandibular joints (TMJ) and ligaments, and the masseter, sternoclydomastoid, and trapezius muscles. First, I suggest simply observing your posture and locations of tension. Do you hunch at your computer? Do you bend your neck to your phone or do you bring your phone up to meet your eyes? Do you clench your teeth when you're concentrating on a task? Does your voice feel tired by the end of your workday? Do you clear your throat out of habit or need? The masseter - our main muscle of mastication - is one of the strongest muscles in our body for its size/weight. It can apply 150-200 lbs of pressure to objects between our molars! For those of us who clench or grind our teeth, this strength can aggravate our temporomandibular joint. This strength can hinder us when a day's worth of tension or accrued TMJ discomfort keeps us from releasing our jaw when we sing or transfers tension to our neck. Here are a few tips to help you minimize jaw tension throughout the day, and to release that tension if it accumulates. 1. Use the action of chewing to help free up your jaw and TM joint. Imagine chewing a giant piece of gum or making cartoonish chewing motions. Let your jaw swing downward and to the sides in a natural circular motion. 2. Massage jaw line - Use your fingertips to massage the jawline. Start at the TM joint where the cheekbone meets the jaw in front of the ear. Work your fingertips down along your jawline. Gently add your thumb to massage the jawline under your chin. 3. Masseter massage and press. Use your fingertips to massage the masseter muscle. Starting an inch or two in front of your ear, work your way straight down from the cheekbone (the zigamatic arch) to the bottom of the jaw (the angel of the mandible). Move your fingers up and down the masseter. Try this with the jaw closed as well as open. Gently clench your teeth if you aren't sure where your masseter is - you will feel it flex. For a deeper, more tenderizing massage - open your jaw and put your thumb into the masseter between your molars and press directly back toward your ear. You can also try this from the inside of your mouth. |
AuthorWrite something about yourself. No need to be fancy, just an overview. Archives
March 2022
Categories |
 RSS Feed